Overview
The KHA Unity UI System is a package for the Unity engine, designed to simplify working with UI through code.
The system’s key features include:
- A convenient mechanism for displaying and closing UI entities with a single line of code.
- Automatic support for correct layers for all UI elements.
- Flexible and extensible system of animated transitions between UI entities.
By using the system, you don’t have to worry about mechanism of showing, hiding, or maintaining UI elements in a correct state. Focus on creating UI content for your project, and the system will take care of the rest.
The system doesn’t impose any specific architectural pattern; you can use MVC, MVP, MVVM, or any other approach at your discretion. It is also independent of third-party plugins and can be seamlessly integrated into any project. However, there is a version that includes DOTween, if you chose it as a main tool for your UI animations.
Main concepts
The base unit under the direct control of the UI System is called the UI Entity. To enable the display of UI Entities in different styles, the concept of a Layer is introduced (do not confuse it with Unity Layers). The UI System Layer is essentially a container for UI Entities, with its own position in the the hierarchy of the root UI prefab and a dedicated canvas with specific settings. There are several types of Layers.
First is called Windows Layer. This layer holds UI Entities (let’s call them Windows) in a manner which mimics a stack structure. New windows can be added only on top of already existing and removal is possible in the direction from top to bottom. Simple example of a windows sequence could be:
Another layer is named the “Panels Layer,” which contains fully independent UI Entities with no mutual connections in terms of layer structure and entity lifetimes. These UI Entities are referred to as Panels.
There are two instances of the Panels Layer: the Overlaying Panels Layer and the Underlying Panels Layer. One is configured to display all its entities on top of any window, and the other – behind the Windows Layer. A good use case example for panels is a gameplay notification that informs the player about the completion of some crafting process. This assumes that it can happen at an arbitrary moment in gameplay, when any window can be opened.
Finally, the World Windows Layer is a special layer holding the so-called “World Windows”: UI entities visually anchored to 3D game objects in a scene. Imagine in your game you have a village with a few buildings to be constructed. Each building has a construction menu – a window (perhaps not only one but a hierarchy of them) with some parameters. If you would like to show such windows not in the center of the screen but somewhere on top of a building, World Windows are the right choice. In fact, they are not located in true world space; they are still part of the UI canvas hierarchy, and their position is recalculated periodically to simulate being anchored to a 3D object. Therefore, they will never be covered by an NPC or any other moving object in the scene.
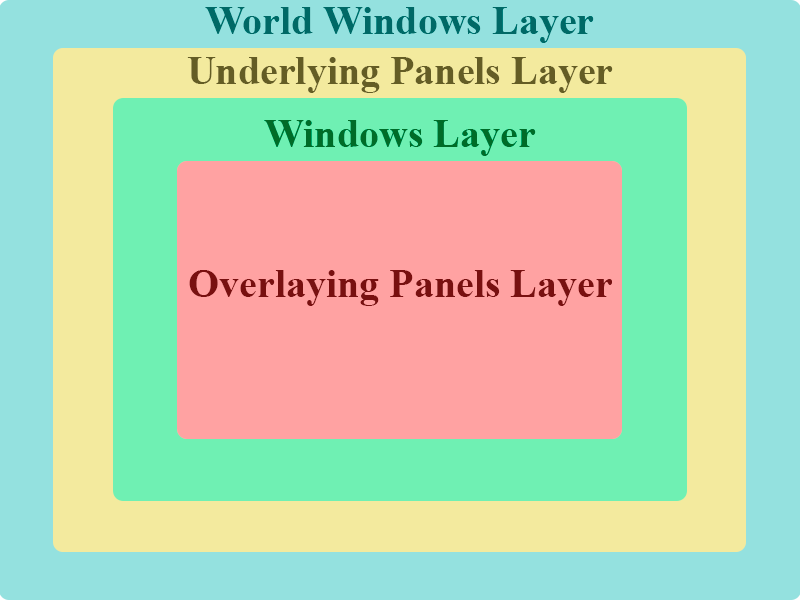
Layers order.
Compatibility
The UI System package is expected to be compatible with any version of Unity starting from Unity 2021.2.0f1.
Installation
Latest version of the package can be found on the github.
To install the KHA Unity UI System, simply import the .unitypackage into your project.
UI prefab structure
Main UI prefab
The KHA Unity UI System requires a single prefab named “UISystem” to be active constantly when the system is in use. It is already prepared: depending on your project structure, you can place it in a scene that remains active throughout the entire gameplay session, or you can simply put it in the DontDestroyOnLoad section. The prefab structure is as follows:
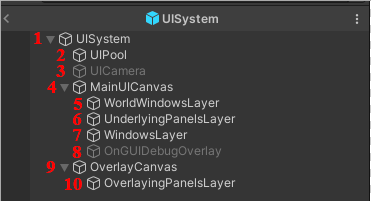
where:
- Root of the prefab. Contains the main UI System script.
- UI Pool. The package includes a simple implementation of a pool, which if necessary, can be replaced with another version as long as the IUIPool interface is implemented.
- Camera for UI. By default, the entire UI is rendered in Screen Space Overlay mode for performance reasons. However, if a specific UI Entity has a 3D object inside (corresponding checkmark on a prefab must be set), the main canvas will automatically be switched to Screen Space Camera mode, and the UICamera game object will be activated.
- Main canvas for all UI elements. Reference resolution and screen match mode can be adjusted here.
- Holder for World Windows.
- Holder for Underlying Panels.
- Holder for Windows.
- Controller for debugging UI drawn via OnGUI().
- Dedicated canvas constantly set to Screen Space Overlay mode.
- Holder for Overlying Panels.
How To
Create a Window
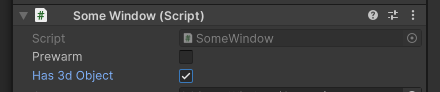
To construct a window, you should create a prefab with a RectTransform, a MonoBehaviour script that implements the UIEntity class (e.g., “SomeWindow” in the example below), a Canvas component, and a Graphic Raycaster component (if you would like your window to be interactable). It is recommended to set the RectTransform of the root object to full-screen mode, as shown below.
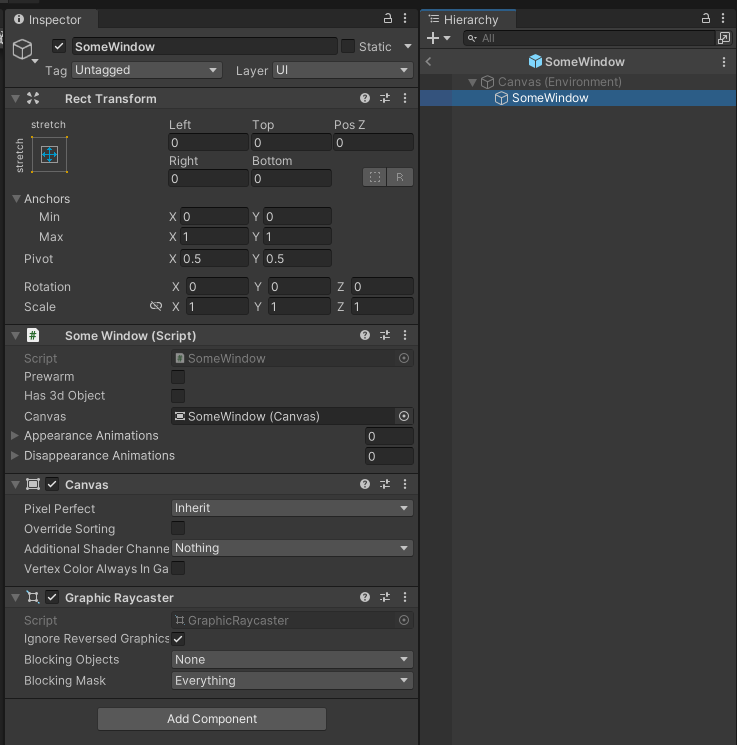
The “UI” layer must be applied to the entire hierarchy of a window prefab. Additionally, remember to link the Canvas component to the window script. The final step to make it ready for use is to assign the newly created window prefab to the list of prototypes in the UI system pool, which is part of the pre-made UISystem prefab.
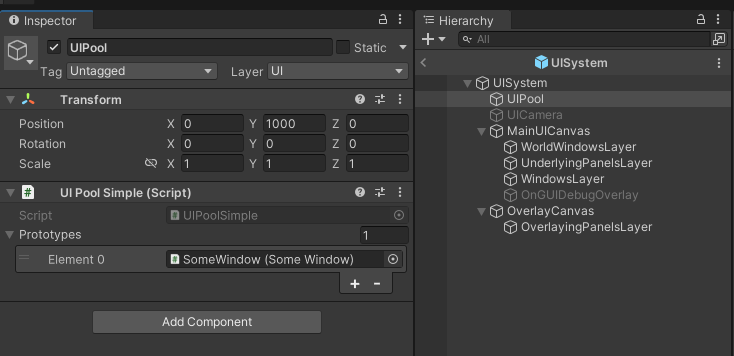
After that, your window will become available to be displayed via the UISystem API. The content of a window prefab can be entirely arbitrary.
Create a Panel
The process of creating a panel fully aligns with the Window creation pipline, but it is recommended to name panels in a different style – even though a panel is also a subclass of UIEntity.
Create a World Window
To assemble a World Window, you can also follow the steps listed in the Create a Window section with only a small difference. Your World Window’s main script should inherit the WorldWindow class, which requires an additional component to be linked: the RectTransform of the root.
Show a 3D object in UI
To display a 3D object in the UI, you can simply place it inside any supported UIEntity (Window, Panel, or WorldWindow) and select the “Has 3D Object” option on the UIEntity’s component.
By default, the main Canvas of UISystem operates in Screen Space Overlay mode, primarily for performance reasons. Using a dedicated UI Camera can result in unnecessary FPS drops, especially with the Universal Render Pipeline (URP). However, if you designate a window as the owner of a 3D object, UISystem will automatically switch the main Canvas mode to Screen Space Camera. Once you exit such a window, the initial state of the Canvas will be restored.
Setup animations
There are two types of animations that every UIEntity can have: an animation of appearance and an animation of disappearance. The system includes a few simple UI animations. To introduce your own animation, you should create a MonoBehaviour that implements the UIAnimationBase class. Then, the script should be placed on the root object of a UIEntity (window, panel, or world window) and linked to a list of appearance or disappearance animations:
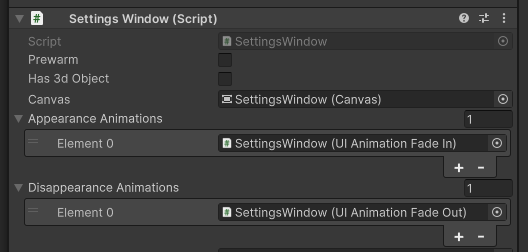
By default, the first animation in the list is used, but through the special scripting API, any other animation from the list can be played if needed (see examples in the Code Examples section).
Code examples
Here and further we assume that the variable
UISystem _uiSystem;
stores a reference to the system facade. The UISystem class is intentionally left as an ordinary MonoBehaviour for you to choose an approach for its injection into other modules of a game. In a simple scenario, the class can be wrapped into a singleton.
Initialization
To initialize the UI System, the only method that must be invoked is:
_uiSystem.Initialize(worldCamera);where worldCamera is a camera that renders the actual gameplay. If your main camera changes during runtime, don’t forget to notify the UI System by calling:
_uiSystem.UpdateWorldCamera(worldCamera);Windows
Hierarchical UI Layer (to which windows belong) is maintained via commands approach, therefore a windows appearance and disappearance are asynchronous.
The most complete method to show a window is:
_uiSystem.Windows
  .Show<MyWindow>(ShowInHierarchyStrategy.OnTop)
  .AppearWith<UIAnimationScaleUp>()
  .DisappearWith<UIAnimationScaleDown>()
  .OnCreated(window => window.Init(parameters));
where almost everything is optional, so if you are content with the default values, just use the following approach:
_uiSystem.Windows.Show<MyWindow>();
A callback passed to the OnCreated method is supposed to be used for window initialization. Since you are getting the requested window of the original type, you are free to use any structure of parameters you are passing to a window. It depends on the way you constructed the window.
A tip
Although dependency injection into UI Entities can be done in an arbitrary form, I recommend choosing a single approach (at least a consistent method naming) and using it for every UI Entity in the project.
A window can only be added to the top of the “stack.” The Strategy parameter defines how other windows in the hierarchy will react to the appearance of a new UI Entity. Multiple windows of the same type can be shown simultaneously.
To hide a window, invoke:
_uiSystem.Windows.Hide<MyWindow>(HideInHierarchyStrategy.ActivateAllPrevious);
or invoke the method without parameters to use the default strategy:
_uiSystem.Windows.Hide<MyWindow>();
If the window you are hiding is not the last one in the hierarchy, then all windows starting from the specified one will be closed. In the case of the existence of multiple windows of the same type on the “stack,” the highest one will be chosen for closing.
Panels
Unlike windows, due to the simplicity of the Panels Layer, all manipulations with them are performed in a single frame.
The most comprehensive way to show a panel is:
_uiSystem.Panels.Show<MyPanelType, UIAnimationScaleUp, UIAnimationScaleDown>(FlatShowStrategy.Default);
which can be further shortened to:
_uiSystem.Panels.Show<MyPanelType>();
And there are a few options to hide a panel:
_uiSystem.Panels.Hide<UIAnimationScaleDown>(myPanel); // hide with overridden animation

_uiSystem.Panels.Hide(myPanel); // hide with default animation

_uiSystem.Panels.HideAll<MyPanelType>(true); // hide all panels of type in overlaying layer

_uiSystem.Panels.HideAll<MyPanelType>(false); // hide all panels of type in underlying layer
World Windows
World windows are technically a family of window hierarchies, where each hierarchy is attached to a 3D game object in a scene. Thus, the approach to World Windows manipulation is very similar to the usage of ordinary windows with one small difference. In addition to common parameters, you always have to pass a UIOwner script – a MonoBehaviour that represents a 3D object to which the shown World Window must be anchored.
Examples of showing:
// Fully custom case:
_uiSystem.WorldWindows
  .Show<MyWorldWindow>(_uiOwner, ShowInHierarchyStrategy.OnTop)
  .AppearWith<UIAnimationScaleUp>()
  .DisappearWith<UIAnimationScaleDown>()
  .OnCreated(window => window.Init(parameters));

// Simplest case:
_uiSystem.WorldWindows.Show<MyWorldWindow>(_uiOwner);
Examples of hiding:
_uiSystem.WorldWindows.Hide<MyWorldWindow>(_uiOwner, HideInHierarchyStrategy.ActivateAllPrevious);

// or

_uiSystem.WorldWindows.Hide<MyWorldWindow>(_uiOwner);
Worth noting, since the proper positioning of a world window requires some internal calculation, the process was optimized by stopping recalculation when a UIOwner game object is not visible on a screen. For the system to know that, UIOwner should provide at least some renderer of a 3D object – the holder of a World Window.